
Source Control Management
Source control is the practice of tracking and tracking changes to code. Source control management enables development teams to connect Internal to their GitHub repositories and manage and control changes with Git.
Source control management is available as part of Internal’s Growth plan. Access to source control management requires Admin level permissions.
Source Control with GitHub
Create a new repository in GitHub
Create a new repository in GitHub with a README.md and main branch to manage all of your Spaces with source control. Internal uses one repository to manage all of your Spaces.
Create a GitHub app to work with source control management
In GitHub, navigate to Settings > Developer Settings > New GitHub App
Give your GitHub app a name and leave the default settings as is until you scroll to Webhook. Uncheck this box.

In the Permissions section, select Repository permissions. Change access to read and write for Contents and Pull requests.


Check that the GitHub app can only be installed in your organization.

Take note of the App ID which will be used to connect GitHub to Internal.

Generate a private key. This key should be downloaded automatically to your machine. You will need to open this .pem file using your text editor to reveal your private key.

Scroll to the top of the page and click Install App on the left hand navigation menu. Install the app into your organization.

Retrieve your installation ID
In GitHub, navigate Settings > Under Integrations click Applications > Click Configure >
The installation ID is at the end of the URL. If your URL is https://github.com/settings/installations/33712729, your installation ID is 33712729
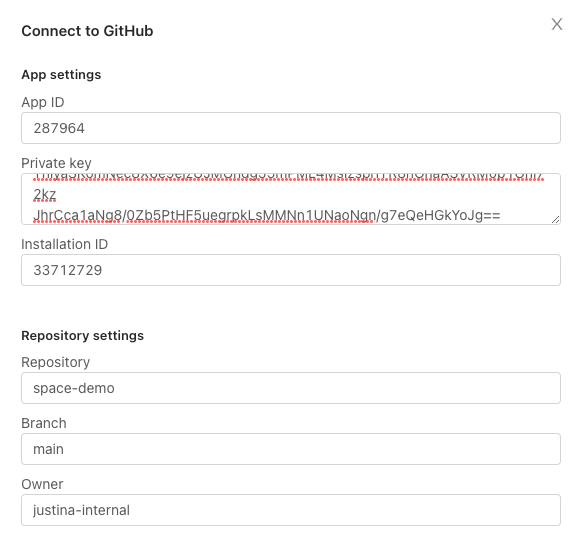
Connect GitHub to Internal
Go back to Internal and navigate to Source Control Management in the left hand navigation menu. Connect to GitHub with App ID, private key, Installation ID, Repository, Branch, Owner (name of GitHub organization).
Manage Space with GitHub
Create a new Space, Save, and Publish. Navigate back to your Spaces dashboard and select the Space you want to manage with source control. On the right hand navigation, click Manage with GitHub. This will initialize a Git branch and a pull request.


After working on your internal tool, click Save and then navigate to GitHub Actions on the upper right hand corner to Commit and push new changes.


When you are ready, open a pull request and review your changes in GitHub. After verifying the changes, you can merge your pull request into the main branch with Git.

You can have multiple branches per-environment and publishing is per-environment so you can run the Space after working on it.
Tracking branches
You can track existing branches and sync branches in GitHub that you created with Git and/or in GitHub.
- Expand the branch-selector menu and click "Track Existing Branch"
- Type the name of the branch as it exists in Git
- Click "Track branch"
The branch will now be visible in the branch selector and can be used to push and pull from.
You can also un-track a branch when a branch is deleted in Git. Just click the menu button at the far end of the branch-selector button and follow the prompts.
Syncing
When a change is made to a branch outside of Internal, or outside of your current view (e.g. someone else made changes to the branch), your branch will be behind. You will be prompted to sync in the Space editor. Click the "Sync now" button. The page will automatically refresh and your branches' version of the Space will be loaded in edit mode.

Permissions and Access
You need to be an Organization Admin to integrate source control management and connect a provider. You need to be a Space admin to have access to source control management. You do not have access to branches if you are not an Admin.
Managing Merge Conflicts
Merging Manually
Rarely, a user might encounter a situation in which their local changes are significantly behind those in the remote repository. When this happens, Internal will be unable to mechanically or automatically resolve those conflicts. Instead, Internal will produce an error indicating that such a conflict exists. When that happens, follow the steps below to affect a manual resolution.
- Ensure that the correct branch has been selected in Internal and note the name (you will need this later).
- In the Space effected, click the menu expander ellipsis, and select “Export as JSON” from the resultant options.

- Find the exported space configuration file in your file system and open it for editing.
- In your command line tool, switch your local git to face the branch from step one.
- `git pull origin ${yourBranchName}` in your command line
- `diff ${yourLocalFile} ${remoteFile}`
- Note the differences listed in the file.
- In the same directory, locate the config file. It will be named the same string as the Space name, but with hyphens and with the file extension “JSON.”. E.g. demo-space.json
- Open this file for editing.
- Using the differential report from step 6, edit the local file until it matches remote file enough to resolve the merge conflict.
- Save the file.
- In Internal, commit and push the changes to the remote branch by using the “Commit and Push” button in the “Actions” dropdown menu.
- The UI should show no more errors and your local and remote branches should be sync’d.
Merge Conflict Managing through GitHub’s UI
When presented with an error message in Internal’s UI that a merge conflict exists, you can resolve it in GitHub.
- Navigate to the branch to which you are attempting to commit.
- Locate the “Resolve conflicts” button in the center of the “Conversation” tab and click it.

- In the resulting view, follow the prompts in the UI to resolve the conflict.

- Once resolved, merge the changes.
- Back in Internal, click the “sync” button in the edit mode of the Space to which you were attempting to commit.

- The two branches should be resolved and the Space functioning as expected.