
Promo Code Manager
This tutorial will walk you through how to build a promo code manager to create and manage discount codes. This tool reads and writes to your database or API.
You will need to connect a data source with read and write permissions to the table in which you want to manage promo codes. This tutorial uses a PostgreSQL database and the following functions generated by Internal: list promo codes records, insert promo codes records, update promo codes records, and delete promo codes records.
E-commerce
Marketing • Operations

Build from a handful of drag-and-drop components
Displays a list of records in table format. Customize the layout with flexboxes, image components, buttons, and more.
A quick and easy way to add a button that opens up a form in a modal and executes a function upon submit.
How to build:
Promo Code Manager
Drag and drop a Table component into your Space and configure it with the function List promo codes records to display your promo codes.

Add a Pop-up Form and configure it with the function Insert promo codes records to enable creation of a new promo code which will then be added to your database. Configure fields that you want users to be able to edit: promo_code, description, and discount_percent.

To allow for in-line action to edit or delete a selected promo code, add 2 Pop-up Form components into the table by clicking the plus icon next to Columns and selecting Components > Pop-up Form.

For the Edit button, configure the Pop-up Form component with the function update promo codes record to create a form for users to edit an existing promo code. Configure fields that you want users to be able to edit: promo_code, description, and discount_percent. You can also configure hidden fields such as updated_at to update when a user submits edits. You can set default values for each of the fields in the form to make it easier for users to see what changes they are making by selecting Default Value > Pre-fill with value from component > This Table / Selected Row / data.

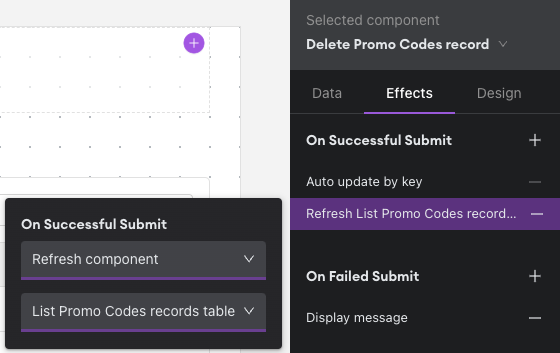
For the Delete button, configure the Button component with the function Delete promo codes record to enable deletion of promo codes. To indicate to the user that the promo code has successfully been deleted, under Effects configure the component to Refresh the table On Successful Submit.
Tip!
Instead of using buttons for the in-line actions, you can display a link icon. Under the Design tab within the component, select Link as the style type.
