
HTTP Functions
An HTTP Function can be used to call REST APIs, GraphQL, SOAP APIs, or any other HTTP request. Once you create an HTTP Function, both coders and non-coders can use it to build tools in Internal. Max request size for HTTP Functions is currently 10MB.
Note:
You must first create an HTTP data source to create custom HTTP functions.
Getting Started
To create or edit a Function, you’ll need to use the Function Editor. You can access the Function Editor from one of two places:
- From a Space: Go into Edit Mode and click on the App Data icon in the left nav.
- From Company Settings: Go to Data & Functions, click on the desired HTTP data source, and click on the Functions tab.
Once you open the Function Editor, name your Function and select the HTTP data source for which you want to create a function.

Configure
Specify your HTTP request in the Configure tab.
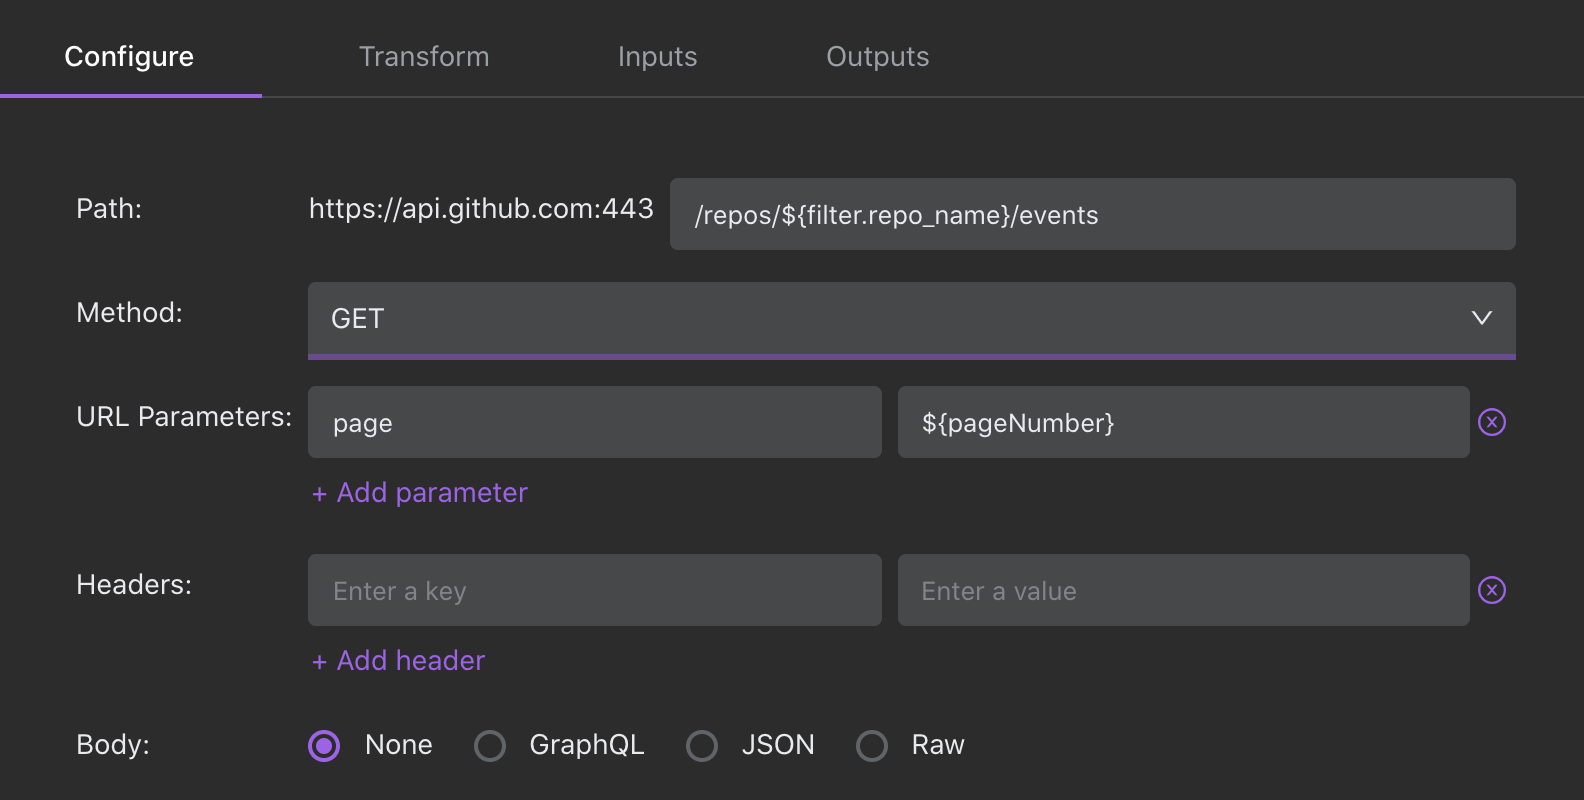
GitHub API to view events filtered by repo using the reserved filter parameter ${filter.repo_name}.
URL Parameters
The URL parameters section accepts Javascript template literals. To define variables, filters, pagination, and/or sorting for your request, use dynamic parameters and reserved parameters. Note that you can also choose to provide URL parameters within the path or in the URL Parameters section. Any parameters provided within the URL Parameters section will override parameters provided in the path, if there are conflicts.
Headers
The header section accepts Javascript template literals. To define variables, use dynamic parameters. Note that any headers you added when you connected the HTTP Data Source will be passed along in addition to the headers you define in this section. If there are conflicting values for the same key, the value defined for the Function will win over the value defined at the data source level.
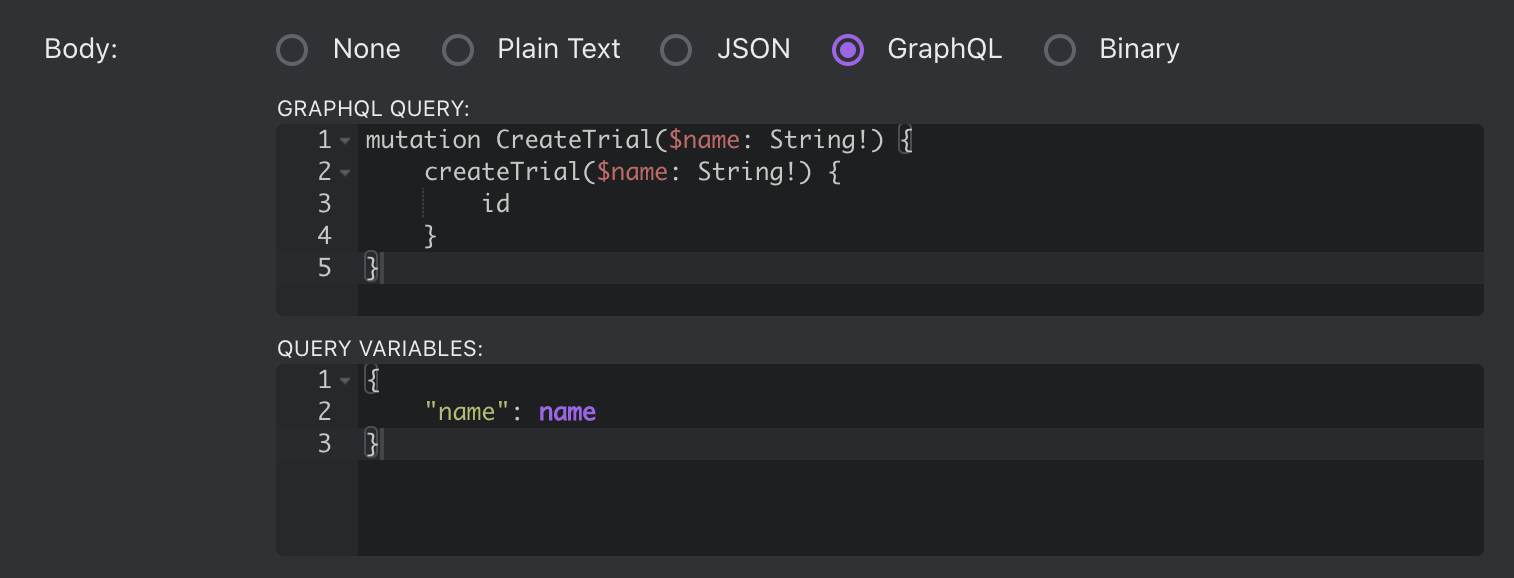
Body
This is the content (payload) to be sent through the HTTP request. The body accepts Javascript.
- None: Will not send a body with this request (typically used for GET and HEAD)
- Form: Add names and values for your form. Select from URL-encoded or multi-part form.
- JSON: Enter in your JSON body (must be in proper JSON syntax).
- GraphQL: Enter in your graphQL query in the first box. In the second box, you can add your query variables, formatted as a JSON object.
- Plain Text: Enter in plaintext for the body. If left empty, the request will send a body with an empty string.
- Binary: Use to transmit raw bytes as the body of your HTTP request. (for files, you can uses parameters to specify file.name, file.type, and file.data)
Similar to the URL Parameters and Headers sections, you can define variables (dynamic parameters) for your Function in the payload in the format of user_email.
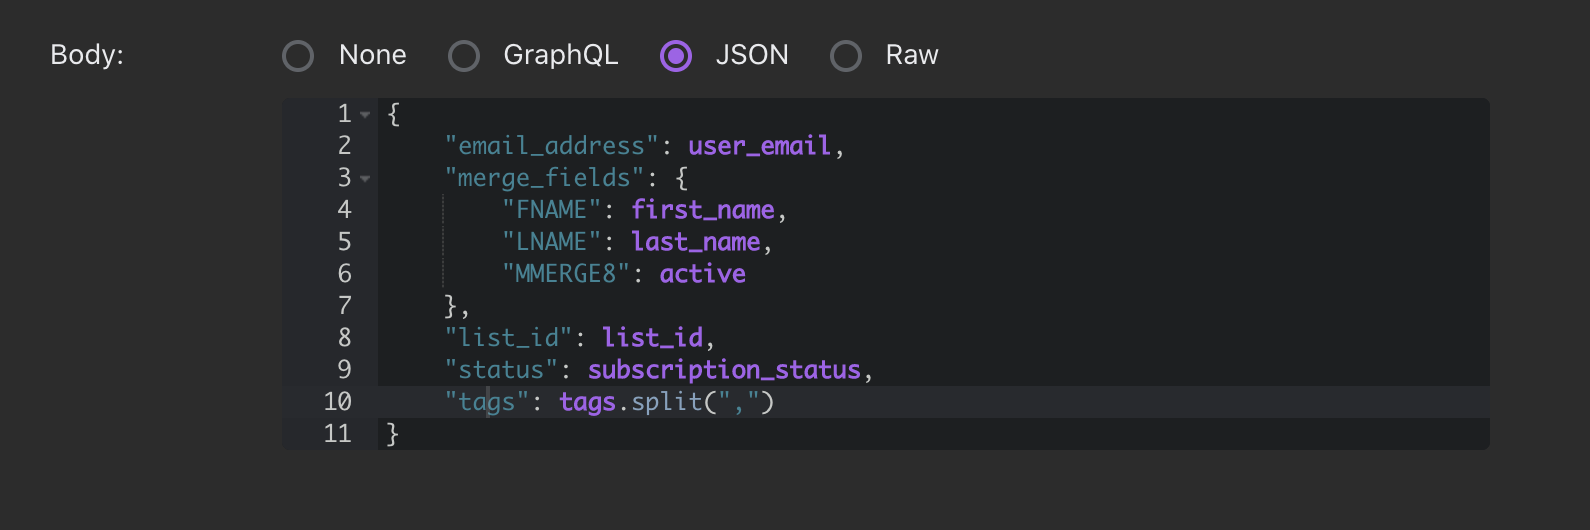
Example payload for an email service with user_email, first_name, last_name, active, list_id, subscription_status, and tags defined as dynamic parameters.
GraphQL example. Query variables are defined in JSON format.
Run Function
Note:
The Run Preview function does not use the "Auth" flow for executing functions. As a result, any flow which utilizes auth has to be tested from its associated Space, or have their auth temporarily suspended.
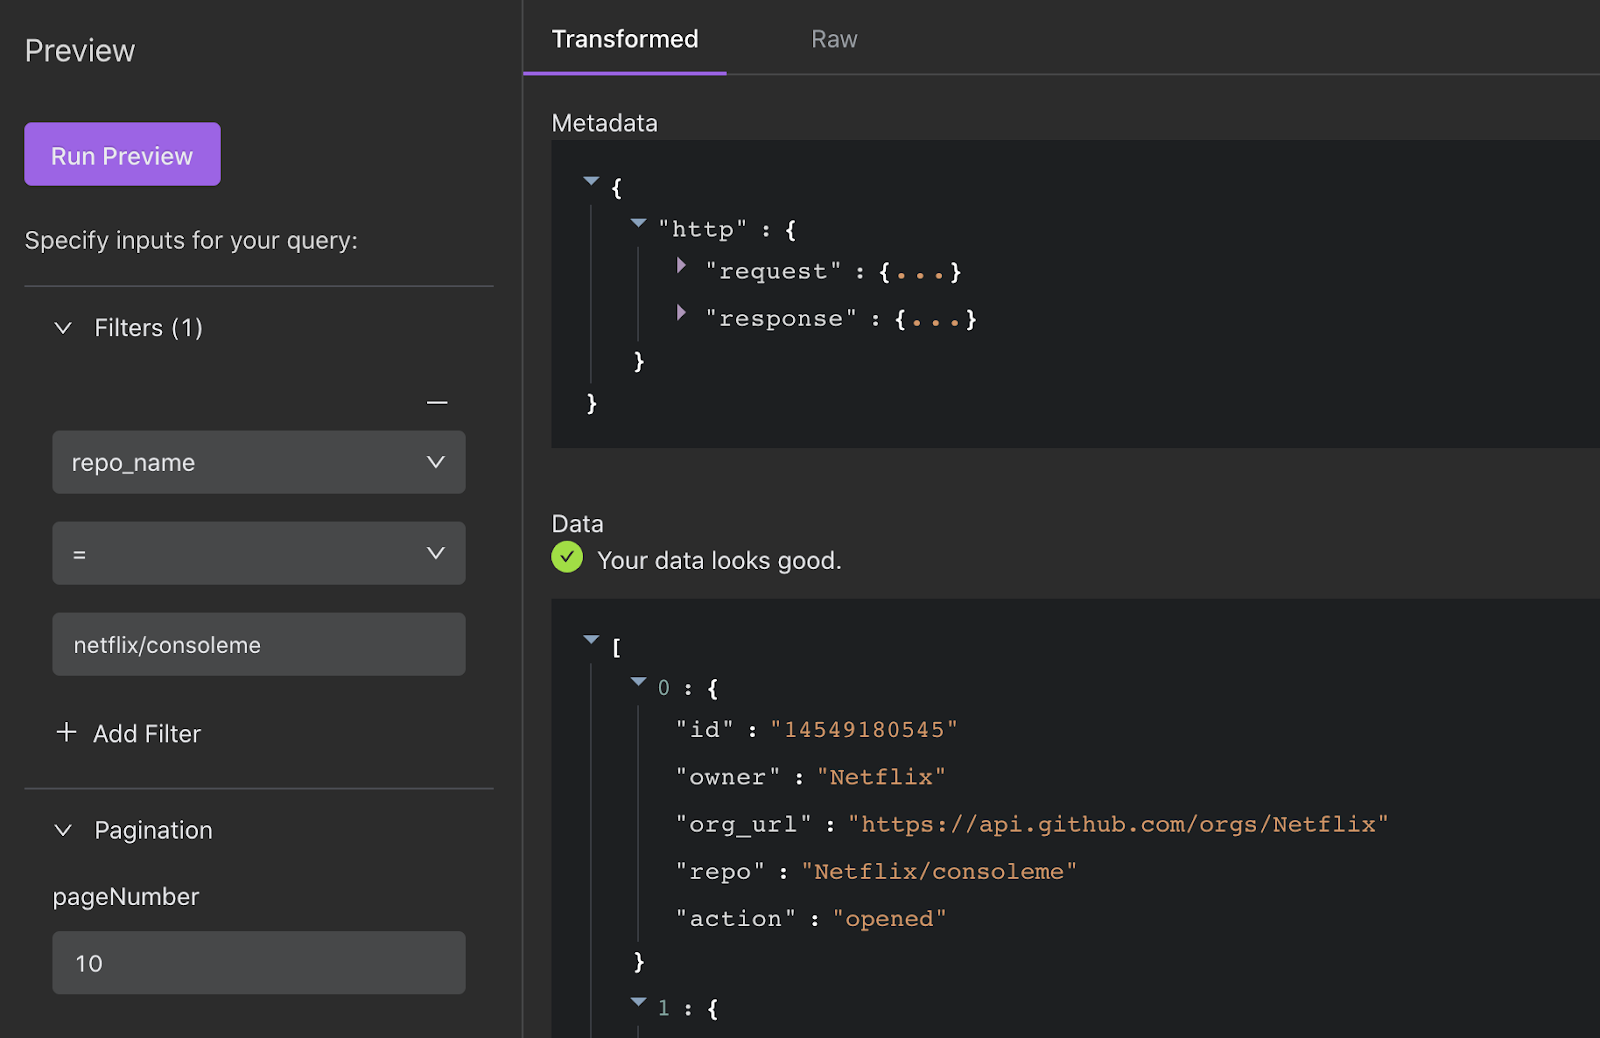
Once you've configured your response, click the button to "Run Function". This will run your HTTP request and generate the raw and transformed responses.
If your request includes the reserved parameters sortBy or filter, you’ll need to go to the Inputs section to configure your sortBy and filter fields. Once that’s done, specify filter/sortBy values, and run your function.
By default, the Transformed Response returns the data from your request. You may need to transform your response further to get it into the proper format. See the next section “Transform” to learn more.
Transform
There are a number of reasons why you may want (or need) to transform your response using a Transformer. For example, you may want to:
- Transform the response into an array of objects or a single object. Most components in Internal require your Function to return an array of objects or a single object in order to display the results of your HTTP request.
- Transform the response to return a specific set of fields. In many cases, your request may return too many objects, objects that are deeply nested, or otherwise in a format that doesn’t work for the tools you want to build.
Transformers can be written using Javascript expressions. You can find examples in the docs for Data Transformation.
Note:
Transformers are limited to a MAX of 2048 characters.
Inputs
This section is where you configure the inputs of your Function. Think of inputs as fields in a form component, a primary key input that is used to retrieve a record, or filter or sorting inputs for a table component. There are three types if inputs:
Dynamic Parameters
This section auto-populates when you use dynamic parameters (e.g. ${foo}) in your HTTP request. Learn more about dynamic parameters.
Filters
When you add the reserved filter parameter (e.g. ${filter.foo}) to your HTTP request, you’ll also need to specify the corresponding filterable field (e.g. Foo) as an input to your function. Once specified, the filters are available in components like table, detail, and card list. Learn more about reserved parameters.
Sorting
Once you add a reserved parameter for sorting (e.g. ${sortBy}) in your request, you’ll also need to specify the corresponding sortable field in this section (e.g. Foo). Once specified, the sortable field will be available in components like table and card list. Learn more about reserved parameters.
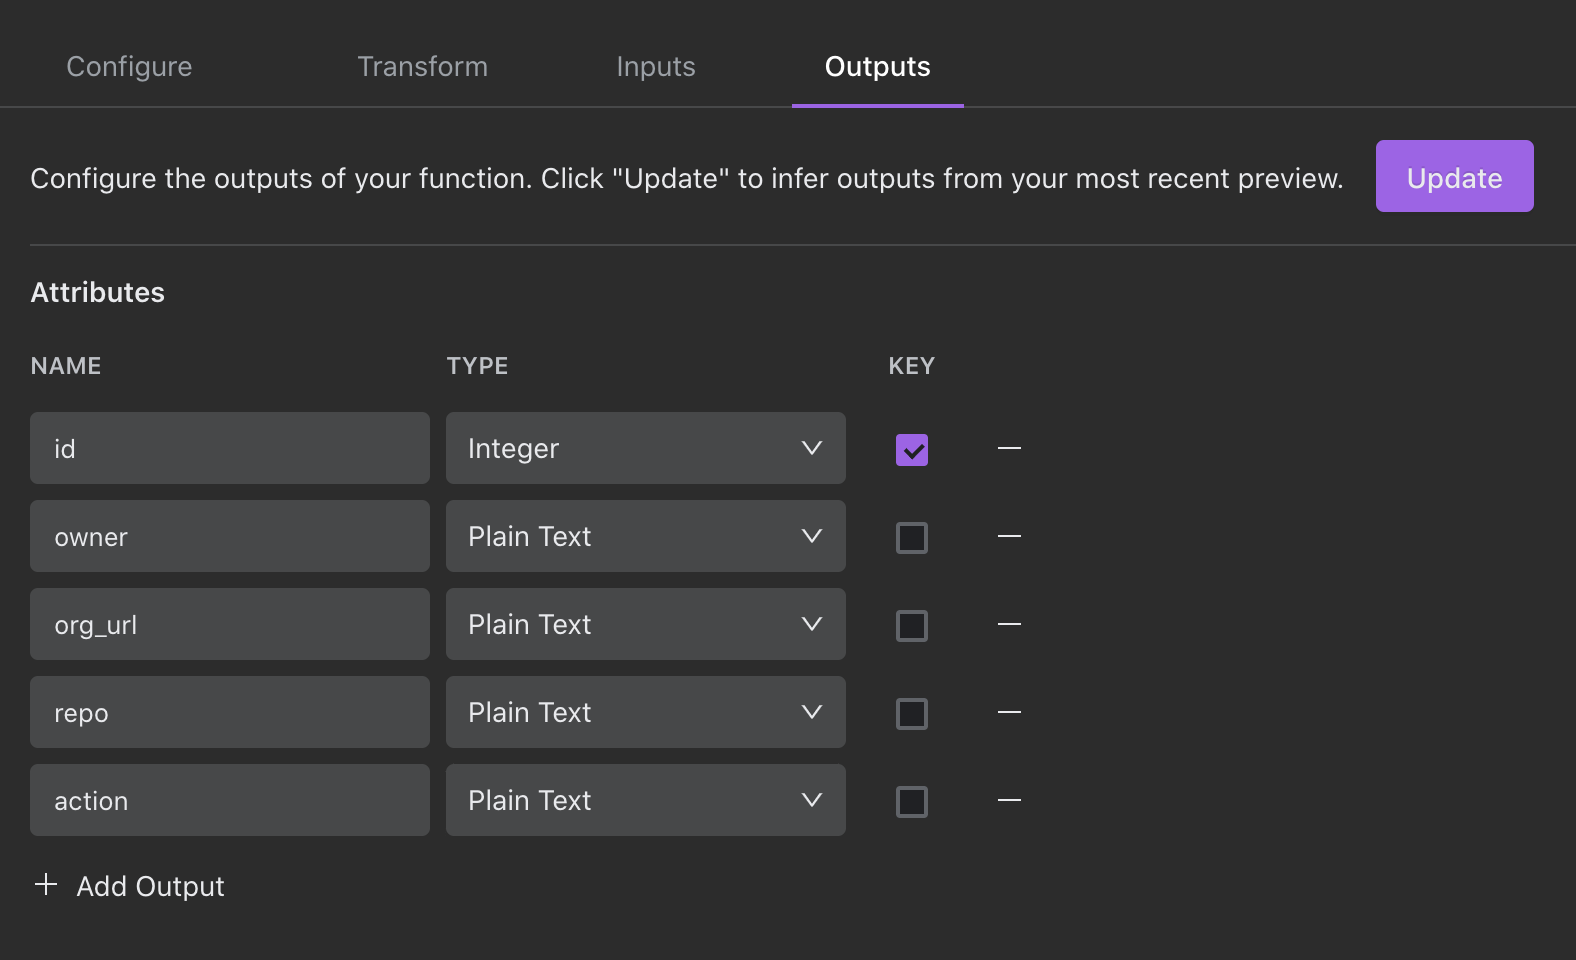
Outputs
This section is where you configure the outputs of your Function. You can manually add outputs or click the Update button to infer outputs from the last execution of your function. Think of Outputs as table columns or fields displayed in a detail component.
- Name: This is the name of the attribute (e.g. column name in a table or field name in a Detail Component).
- Type: This is where you can specify the field type.
- Key: This is the combination of attributes that make the row unique. Key(s) are used by additional features like automatic row updates and auto linking.
Permission
You can configure permissions for HTTP functions in Roles & Permissions within Company Settings. Learn more.
Pagination
It is possible to paginate result sets from HTTP functions using either a pageCursor or the other pagination parameters described below. We will demonstrate how by way of showing how to paginate a result set from Stripe's API into an Internal instance after a brief explanation of how Internal defines our pagination parameters.
Special function pagination parameters:
- pageSize: The size of the page to retrieve.
- pageNumber: The number of the page to retrieve (this is the same as pageOffset / pageSize)
- pageOffset: The offset of the start of the page to retrieve (this is the same as pageNumber * pageSize).
- pageCursor: The cursor for the page to retrieve. This should only be used if endCursor has been generated by the metadata transformer.
In general, these pagination parameters only need to be used for HTTP data sources and SQL data sources using raw SQL queries (Select queries automatically generate pagination support).
In order to support cursor-based pagination, the page.endCursor returned from the metadata transformer is provided as the pageCursor parameter when requesting the next page, as long as page.hasNext is true.
For example, the first page of a table will be loaded with pageCursor set to null. If that function returns the following metadata { page: { endCursor: "next", hasMore: true } } then the second page of the table will be loaded with pageCursor set to "next".
Example
The Stripe API uses cursor-based pagination, the following is a full working example of configuring a function for their customers list endpoint.
- Create a new HTTP data source:
- URL:
https://api.stripe.com - Basic Authentication
- User: API key
- Password: Blank
- URL:
- Create a new function:
- "Configure" tab:
- Path:
/v1/customers - method:
GET - URL Parameters:
(${pageCursor ? 'starting_after' : ''}: ${pageCursor})- starting_after URL parameter${pageSize ? 'limit' : ''}: ${pageSize}- limit URL parameter
- Path:
- "Transform" tab:
- Append the following to the bottom of the existing "Metadata Transformer": - API response
- "Configure" tab:
const endCursor = data.data[data.data.length-1].id;
const hasNext = data.has_more;

({ page: { endCursor, hasNext } })
- Click "Run Function"
- "Outputs" Tab:
- Click "Update" to infer outputs from the last execution of your function.
- Click "Save"
Updated about 1 year ago